Sunday 13 March 2016
RAMPS D8 and D9 mixed up
After the accident with the first RAMPS I bought new one and it arrived couple days ago. I moved jumpers, steppers and wiring to it from the old one but I could not get it to work properly. The fan at D9 and heat bed at D8 were somehow bridged and worked at the same time. I didn't see any obvious soldering mistake on the back side of the board so I was quite puzzled. Some searches on the RepRap forum gave me a hint and the problem turned out to be MOSFET heat sinks touching and messing up the logic. Only a little bending was required and now the printer is operational again.
Thursday 3 March 2016
10 tips for RepRap P3Steel builder
These are my tips for anyone building a P3Steel printer. I did not purchase a kit so some of these might not apply for kit printer builders.
- Get plenty of LM8UU bearings. Tolerances vary a lot so it is better to order at least 2x the required amount. They are cheap after all. Or use alternatives like IGUS.
- Try to get printed parts in good quality and as a dedicated set for P3Steel. Using some generic Prusa i3 parts is possible but requires more manual work. Also, think about using upgraded parts like Toolson edition straight away.
- For heat bed I have been using ordinary 4mm glass. It is cheap and available at local glass shops. So far I haven't had any heat related issues with PLA temperatures.
- Plan for cable management. There is plenty of wiring going around and some of it is moving around with hot end etc. So you'll need also cable sleeves, heat shrink etc.
- Be careful with 8mm rods. Especially longer lengths can be bent when handling or hammering in to the frame.
- After couple initial test prints, go around and tighten up all the screws. I have had screws falling of from flexible couplings and belt pulleys.
- Purchase enough M3 screws in various lengths. Not only you need plenty for the frame assembly but you will also need them to put together cooling fan supports etc.
- Z end stop setting needs to just close enough. No need to go mental as the fine tuning can be done in software.
- Print from SD card in order to avoid connection issues and pauses with USB
- Zip ties and hot glue. Shortcut to get first print out :-)
Saturday 27 February 2016
Enclosure controller
As mentioned in an earlier post I have a plan to add an Arduino Uno based controller for enclosure. Its responsibility is to monitor temperature, control ventilation fan speed and switch on the main relay. It also has a simple 1602 LCD display shield for temperature and other information. At the moment I haven't planned any use for the keys of the display shield.
So far I have been testing the design on a breadboard in order to get temperature reading and relay control working. I have plenty of 100k Ohm NTC 3950 thermistors so I used one to measure temperature using voltage divider circuit and Steinhart–Hart equation in the Arduino code. There are plenty of examples online how to wire this up.
The main relay is an automotive 40A relay with integrated fuse socket. The funny thing was it actually came with a 30A fuse. That should be enough, though. In order to energise the coil of the relay I used BC548 NPN transistor. I also added 1N4148 as a flyback diode.
Adding a PWM controlled 12V should be straightforward. I will use BC548 or BC639 but I might add a capacitor to smooth out the fan control. After I have that sorted out on the breadboard I'll solder everything together.

Wednesday 24 February 2016
Polarity matters
I was reorganising the cabling after I installed the cooling fans next to the hot end. I checked there were no loose ends and everything seemed to be fine. But as soon as I turned the PSU on there was a faint popping sound and no lights on the LCD. I managed to connect wires from PSU to RAMPS wrong way and that instantly fried RAMPS.
Looks like the LCD and MEGA are okay though, I was able to turn them on with USB power and use different features on the controller. However, none of the steppers move and the hot end wont warm up. Just to make sure I decided to order new RAMPS, MEGA and stepper drivers again. This will mean couple weeks pause with printing but I'll use that to design and build an enclosure for the printer.
Looks like the LCD and MEGA are okay though, I was able to turn them on with USB power and use different features on the controller. However, none of the steppers move and the hot end wont warm up. Just to make sure I decided to order new RAMPS, MEGA and stepper drivers again. This will mean couple weeks pause with printing but I'll use that to design and build an enclosure for the printer.
Friday 5 February 2016
Toolson improvements
The plastic parts of my P3Steel are quite a mismatch and I have started to print new ones. I chose very nice selection of essential parts and improvements called Toolson edition. It can be found from http://scheuten.me/?cat=9.
So far I have printed parts for Y axis but I haven't installed them yet. I need to wait new bearings to arrive as it uses smaller flanged bearings. I also have bunch of other stuff on the way including cable sleeves, Kapton tape, 40mm fans etc.
Sunday 31 January 2016
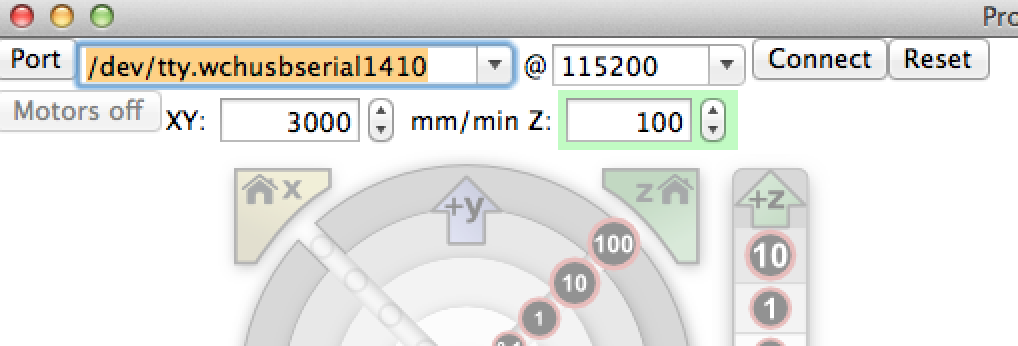
Printrun issues with USB connection and OS X
I spent quite some time trying to get Printrun to connect my RAMPS board. The fix was to set the baud rate lower with #define BAUDRATE 115200 both in Marlin Configuration.h and in Pronterface user interface.
The screenshot below shows necessary details:

But the while I was testing some models there were long pauses in the print. Those were long enough to clog the hot end as the heating was on but no filament was pushed through. After couple attempts I started to use SD-card reader on the LCD display unit.
The screenshot below shows necessary details:
But the while I was testing some models there were long pauses in the print. Those were long enough to clog the hot end as the heating was on but no filament was pushed through. After couple attempts I started to use SD-card reader on the LCD display unit.
First print!
After doing some ugly hacks with zip ties and hot glue I got end stops in place and the printer was ready for its first print. At that point there were plenty of issues waiting to be fixed but I wanted to see if anything usable would come out.

First proper print
Leveling the bed was pretty difficult as I didn't have enough clamps to secure the glass on the PCB. I ended up using some painters tape to hold it for a moment. But that is pretty bad idea. Also, finding the Z level for the first layer took quite a while.
After couple days I managed to find clamps for the glass so I could do the levelling properly. With this essential fix in place I started to print more parts for the printer including a box for LCD, RAMPS fan support, finger guard for the 80mm fan and some smaller bits.
Subscribe to:
Posts (Atom)